

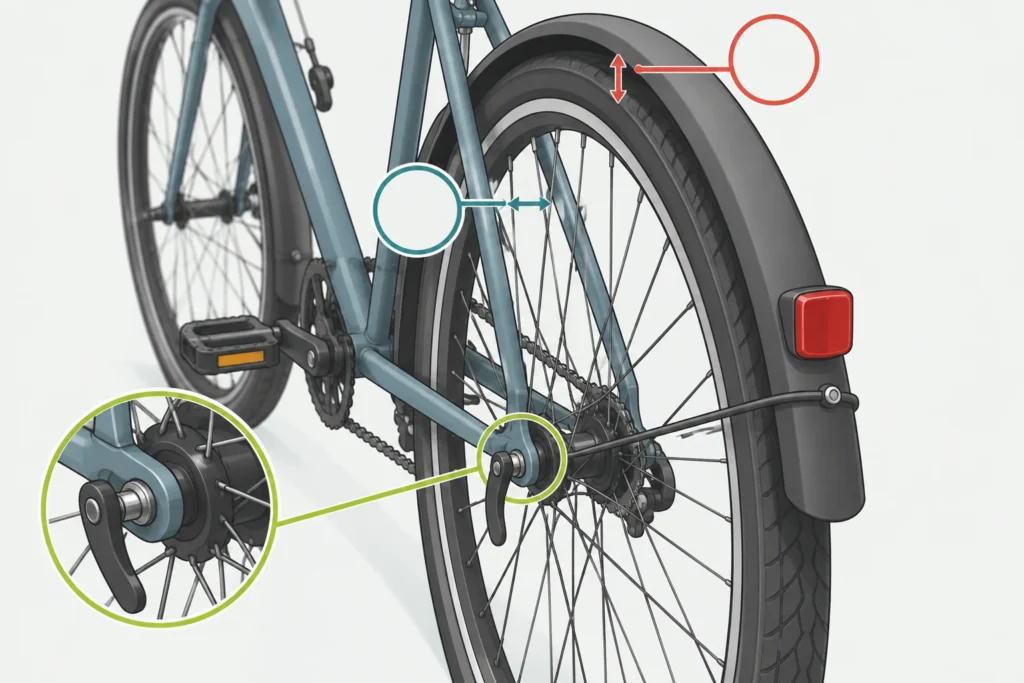
If the rear wheel starts rubbing against the fender as soon as it’s reinstalled, check how the axle is seated in the frame and how it is secured. Timing proves installing the wheel is the problem in a lot of cases, but that is not always the case. A free spinning wheel does not necessarily mean it’s properly seated. You’re not allowed to ride just because the wheel is free to spin.[1][2]
In this imagined scenario, the flat has been repaired. The pump is in the way so the door is blocked, and now the rear wheel is rubbing against the fender. I want to move the fender stay to hide the rub, but I have to be smart. The axle is out of alignment first.
Start where the wheel meets the frame
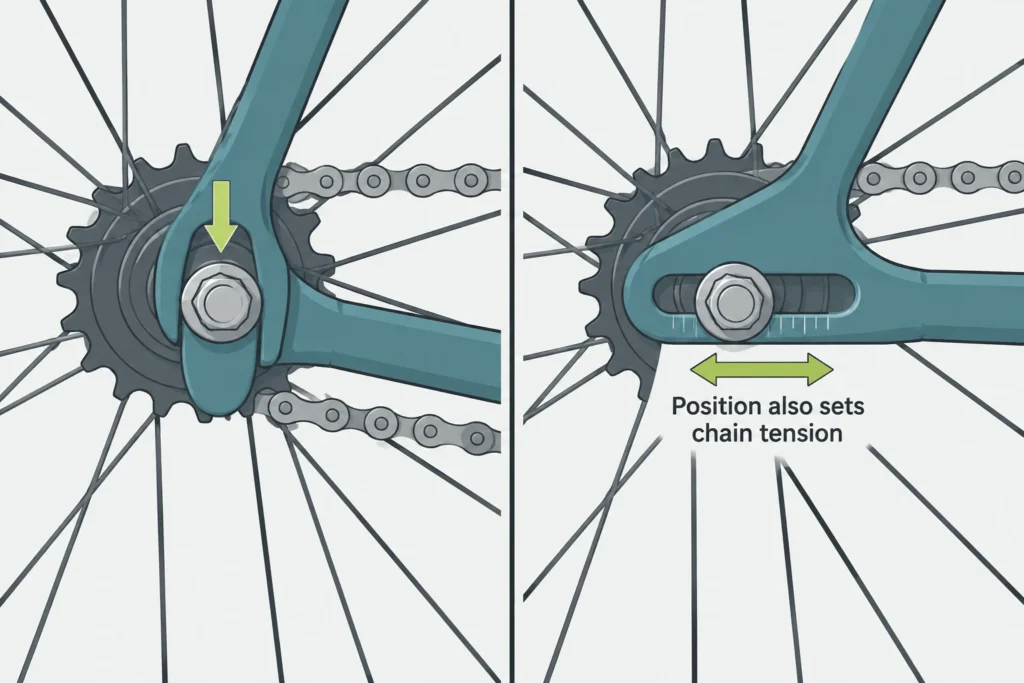
In a conventional frame, the dropouts are the axle mounts. In an open, vertical dropout, both sides of the hub axle need to rest against the dropout. In the case that one side is not seated properly, the wheel is held crooked and the tire is closer to the fender or chainstay. So, I’d check the axle before I check the fender.[1][6]
In horizontal dropouts of some single-speeds and internally geared hub bikes, moving the axle changes the chain tension. In that case, moving the axle all the way to the end of the slots isn’t necessarily correct. You’d need appropriate chain slack, and the hub’s washers and/or tensioners. So, in the case of a single-speed/fixed gear bike, getting the tire to clear the fender is only part of getting the wheel installed properly.[1][3]
- Secure your bike and locate which retention system you have below. If it’s an e-bike, you’ll want to turn off assistance first.
- Using whatever retaining mechanism, release it and check the seating of the axle and required hardware. To better access the derailleur, thread the chain over the smallest rear sprocket. If you have disc brakes, you’ll want to guide the rotor between the pads to avoid damage.
- Once secured, reconnect any rim brakes that were opened during the removal, and verify they’re working properly before taking your ride.
Conventional cam quick-release
Now that the wheel is removed, locate the adjusting nut that is opposite the cam on the skewer. Using the cam lever open, tighten the nut so that when closed, there is tension and it reaches the fully closed position. Spinning the cam like a wingnut doesn’t close the cam. If it swings shut and hits the frame or doesn’t close fully, repeat this process. There are many designs of quick release skewers, and a mark on your palm isn’t proof that the wheel is attached correctly.[1][2]
Thru-axle
A thru-axle passes through closed frame holes and the hub. Seat the hub between the dropouts, align the holes, and start the threads without force. If you meet unexpected resistance early, back the axle out and inspect the alignment. More leverage isn’t the answer. The axle’s length, diameter, and thread pitch must match the frame, and tightening must follow that axle’s specified torque or closure procedure. A lever doesn’t automatically mean quick-release: some levers turn the threaded axle. I can’t give you one torque number that covers these different systems.[1][2]
Bolt-on axle
Hold the wheel in its correct position while tightening both axle nuts to the hub’s specified torque with a torque wrench. Check every washer, including any fender or rack hardware sharing the axle. On some internally geared hubs, dropout-specific non-turn washers have tabs that engage the slots to resist axle rotation; Shimano also specifies the order of accessory hardware. A stack that fits isn’t necessarily a stack that works. If you’ve lost track of it, identify the hub model and recover the washer arrangement, chain-slack requirement, and nut torque before riding.[1][3]
Watch the rim, then the tire
Check the installation, and support the bike with the rear wheel off the ground. Turn the wheel slowly and watch the rim as it moves against a fixed point that does not touch it. Loose objects and fingers should be kept away from the spokes. Tire wear can give you some info. Remember, a tire that wanders too much is better than a rim that wanders too much.[5]
| What you see | What to investigate |
|---|---|
| Rim stays steady; tire wanders or hops | Uneven tire seating or a tire fault. Inspect the bead-reference line on both sides. |
| Rim moves sideways or hops at particular points | Lateral or radial rim runout. This is a wheel problem to assess, not something to disguise by moving the fender. |
| Rim runs steadily but the whole wheel appears offset | Recheck mounting and hardware; persistent offset may involve wheel dish or frame alignment. |
| Rim and tire run steadily; only the fender sits close | A displaced fender or loose attachment becomes a reasonable suspect. |
After you've made a repair and inflated the tire, closely inspect the line molded into the sidewall to make sure it is level. If it's not level, and is either raised or falling into the rim, air should be let out of the tire and the problem should be evaluated, including if the tube is stuck under the bead. It should be repositioned, and all limits should be adhered to when re-inflating.[2][4]
If the rim is consistently offset, it doesn't necessarily mean the frame is bent. Measuring Wheel Dish would require a shop to do, however, you can tell if the wheel is centered. Again, a centerline doesn't mean the tire isn't damaged.
If the wheel is visibly bent, and there is a dish present, a frame misalignment is more likely. When a tire is damaged or has a wobble, centering the wheel doesn't help. The axle should never be clamped in a crooked position, and the frame should never be bent to compensate.[2][6]
Move the fender only after the wheel checks out
If the wheel bearings are ok, then a shifted fender becomes a much more likely and satisfying explanation. There are a number of things that can be checked and fixed without removing the wheel. The fender stays (mounting hardware) can be checked for tightness. The fender can also be repositioned and the attachments secured without disrupting the wheel. How much gap the fender needs is dependent on the fender. SKS specifies that their Raceblade Pro mudguards require a clearance of at least 15 mm. Barely clearing the tire while the bike is unloaded is not sufficient if the attachment is loose and allows the fender to move back into the clearance. And if you are tracing a scrape to a rotor or rim, that means the brake is sticking or is bonded to the rim, and that’s a separate issue from the fender.[1][7]
When the bike stays parked
- You won’t be able to get the correct seat of the axle and ensure a tight fit, or determine the proper hardware, or the correct torque. A wheel that is not properly retained can loosen or come off.
- You see damaged threads on the dropouts, axle shift, deformation or cracks around the dropout mounts, or bent dropout mounts.
- A wheel that has been mounted securely can have unexplained rim offset and significant rim wobble, broken spokes, or even tire frame contact.
- A bulging tire can also cause a rub. Exposed tire casing can also rub. Loose or broken fender attachments can also rub.
- A wheel can be lifted and cleared without issue, but contact the frame when riding because of an improperly seated axle. An unloaded spin may not help explain why the rub is happening.
Let the mechanic know what you have found. “It started when I reinstalled the wheel, now the rim is running true but is centered off” is better than just saying “the fender rubs”. I would rather you pay for a proper diagnosis than for a new wheel to quiet a loud axle warning, or ride with an improper wheel adjustment.
Sources and references
- Park Tool: Wheel Removal and Installation
- Trek Bicycle: Trek Bicycle Owner's Manual, Revision 6 (2026-03)
- Shimano: Dealer's Manual DM-CASG003-06, hub installation
- Schwalbe: Bike Tire Fitting
- Park Tool: Wheel Truing (Lateral & Radial)
- Park Tool: Wheel Dishing (Centering)
- SKS Germany: Raceblade Pro mounting and safety instructions